[SpringBoot/AWS EC2] Controller 생성 및 롬복 설치
1. 간단한 Controller 생성

java 밑에 com.example.springboot 패키지를 만든다.
이 패키지에 Application.java 를 만든다.
|
1
2
3
4
5
6
7
8
9
10
11
12
13
|
package com.example.springboot;
import org.springframework.boot.SpringApplication;
import org.springframework.boot.autoconfigure.SpringBootApplication;
@SpringBootApplication
public class Application {
public static void main(String[] args){
SpringApplication.run(Application.class, args);
}
}
|
cs |
main class 생성 완료
com.example.springboot 패키지 밑에 web 패키지를 만들고 HelloController.java를 만든다.
|
1
2
3
4
5
6
7
8
9
10
11
12
13
14
|
package com.example.springboot.web;
import org.springframework.web.bind.annotation.GetMapping;
import org.springframework.web.bind.annotation.RestController;
@RestController
public class HelloController {
@GetMapping("/hello")
public String hello(){
return "hello world";
}
}
|
cs |
실행한 뒤 http://localhost:8080/hello에 접속해보면,
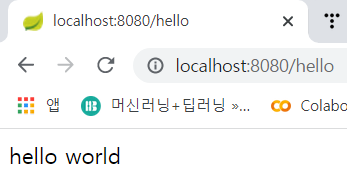
결과 확인 가능
2. 롬복
getter, setter등을 자동으로 생성하기위해 롬복을 설치한다.
build.gradle의 디펜던시에
implementation('org.projectlombok:lombok')추가하고 Refresh

intellij 2021.03 버전이여서 롬복이 기본적으로 설치되어있다. 없다면 Marketplace에서 lombok을 검색해서 설치한다.

Settings >Build, Execution, Deployment > Compiler > Annotation Processors에서 Enable annotation processing에 체크
Enable annotation processing은 lombok을 사용하는 프로젝트마다 설정해주어야 한다.

web 패키지 밑에 dto 패키지 생성 후 HelloResponseDto.java 생성
|
1
2
3
4
5
6
7
8
9
10
11
12
13
|
package com.example.springboot.web.dto;
import lombok.Getter;
import lombok.RequiredArgsConstructor;
//모든 응답 Dto 패키지에 추가
@Getter
@RequiredArgsConstructor
public class HelloResponseDto {
private final String name;
private final int amount;
}
|
cs |
test를 위한 코드 추가

|
1
2
3
4
5
6
7
8
9
10
11
12
13
14
15
16
17
18
|
package com.example.springboot.web.dto;
import static org.assertj.core.api.Assertions.assertThat;
import org.junit.Test;
public class HelloResponseDtoTest {
@Test
public void 롬복기능_테스트(){
String name = "test";
int amount = 1000;
HelloResponseDto dto = new HelloResponseDto(name,amount);
assertThat(dto.getName()).isEqualTo(name);
assertThat(dto.getAmount()).isEqualTo(amount);
}
}
|
cs |
패키지 구조를 src의 main과 동일하게 생성한 뒤, HelloResponseDtoTest.java 추작성한 뒤 실행하면 에러가 난다.
error: variable name not initialized in the default constructor
롬복이 제대로 동작하지 않는다는 의미. 그래들 버전이 달라서 생긴 오류.
1번 해결안 : 그래들 버전에 맞게 롬복 의존성을 추가한다.
Gradle 5.x 미만
dependencies {
  implementation 'org.projectlombok:lombok'
}
Gradle 5.x 이상
dependencies {
  compileOnly 'org.projectlombok:lombok'
  annotationProcessor 'org.projectlombok:lombok'
}
2번 해결안 : 그래들을 다운그레이드한다.
책의 저자 기준으로 그래들을 다운그레이드 해도 된다.
윈도우 : alt+f12 눌러서 ./gradlew wrapper --gradle-version 4.10.2
우선 그래들 7.1 버전에 맞게 롬복 의존성을 추가한 뒤 refresh했다.
현재 디펜던시
|
1
2
3
4
5
6
|
dependencies {
implementation 'org.springframework.boot:spring-boot-starter-web'
testImplementation'org.springframework.boot:spring-boot-starter-test'
compileOnly 'org.projectlombok:lombok'
annotationProcessor 'org.projectlombok:lombok'
}
|
cs |
HelloController에서 RequestDto를 사용해보자.
|
1
2
3
4
5
6
7
8
9
10
11
12
13
14
15
16
17
18
19
20
21
22
|
package com.example.springboot.web;
import com.example.springboot.web.dto.HelloResponseDto;
import org.springframework.web.bind.annotation.GetMapping;
import org.springframework.web.bind.annotation.RequestParam;
import org.springframework.web.bind.annotation.RestController;
@RestController
public class HelloController {
@GetMapping("/hello")
public String hello(){
return "hello world";
}
@GetMapping("/hello/dto")
public HelloResponseDto helloDto(@RequestParam("name")String name, @RequestParam("amount")int amount){
return new HelloResponseDto(name,amount);
}
}
|
cs |
HelloController.java 수정
|
1
2
3
4
5
6
7
8
9
10
11
12
13
14
15
16
17
18
19
20
21
22
23
24
25
26
27
28
29
30
31
32
33
34
35
36
37
38
39
40
41
42
43
|
package com.example.springboot.web;
import org.junit.Test;
import org.junit.runner.RunWith;
import org.springframework.beans.factory.annotation.Autowired;
import org.springframework.boot.test.autoconfigure.web.servlet.WebMvcTest;
import org.springframework.test.context.junit4.SpringRunner;
import org.springframework.test.web.servlet.MockMvc;
import static org.hamcrest.Matchers.is;
import static org.springframework.test.web.servlet.request.MockMvcRequestBuilders.get;
import static org.springframework.test.web.servlet.result.MockMvcResultMatchers.*;
@RunWith(SpringRunner.class)
@WebMvcTest(controllers = HelloController.class)
public class HelloControllerTest {
@Autowired // 스프링이 관리하는 bean을 주입받는다.
private MockMvc mvc; // 웹 API test
@Test
public void hello_리턴() throws Exception{
String hello = "hello world";
mvc.perform(get("/hello")) // HTTP GET 요청
.andExpect(status().isOk()) // mvc.perform 결과 검증(200)
.andExpect(content().string(hello)); // mvc.perform 결과 검증 - hello를 return하는지..
}
@Test
public void helloDto_리턴() throws Exception{
String name = "hello";
int amount = 1000;
mvc.perform(get("/hello/dto") // param 값은 string만 허용
.param("name",name).param("amount",String.valueOf(amount)))
.andExpect(status().isOk())
.andExpect(jsonPath("$.name", is(name))) //json 응닶값을 필드별로 검증
.andExpect(jsonPath("$.amount",is(amount)));
}
}
|
cs |
HelloControllerTest.java 수정
실행시키면 테스트 통과함.